Likely you are like me, you belong to the group of developers that is planning to implement an application, web or mobile (doesn’t matter), with security in-place. Maybe you also heard about the cloud identity providers like Facebook, Google, Twitter, Auth0 or Aws, which have a huge set of features implemented to support current applications requirements regarding security. Nevertheless, there are situations where cloud identity providers are not an option and you still need to have something powerful but implemented by yourself.
- What should i use as authentication / authorisation mechanism to ensure the user claiming an identity is the right one and also has the rights to access the resource he is asking for?
- How to protect user’s identity data?
- What should i use to allow users from other domains to work with the application without requiring a new log in step?
Above questions are the common ones and in this post series i will show you what you need to do to finally get implemented your own IDP. But, wait a moment, first things first:
Don’t do it. Security is quite important to rely its implementation on you
Yes, what i’m going to show you worth if and only if you have checked and analysed the cloud identity provider solution and found that it does not suit into your case.
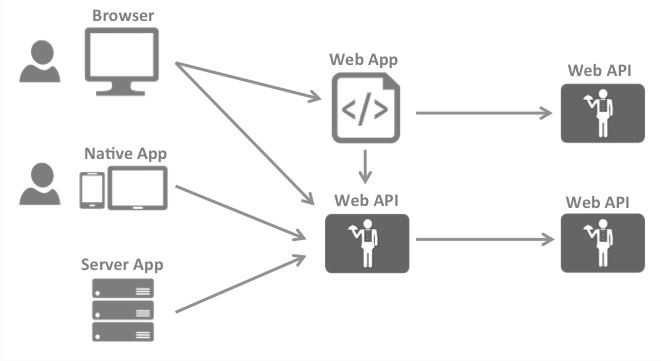
Let’s start with the big picture, it shows at very high level the kind of applications you could find and also the interactions between them.
Yeah, my application follows at least one of this scenario
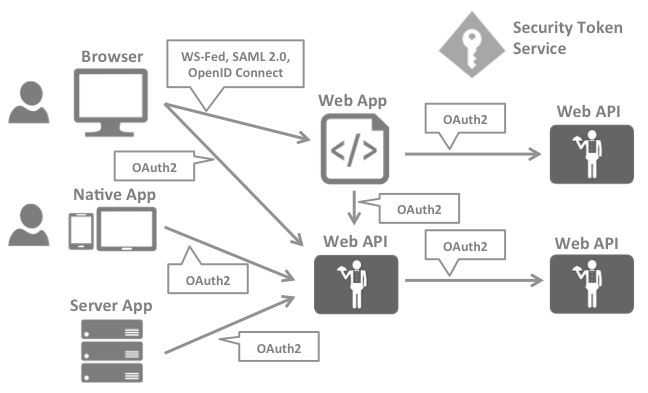
From above interactions is easy to realise that every single layer (front-end, middle-tier, back-end) in the application will need such authentication / authorisation logic to protect resources.
As transactionality and logging, security is an orthogonal concept through the applications layers
Implementing this logic as a security token service avoid having same code duplicated on each layer and isolating it in a service will help to keep security running as an independent piece of software.
SAML2p, WS-Federation and OpenID Connect are the most common authentication protocols but in this post we are going to talk about the later as it’s considered to be an standard in the future, in fact OpenID Connect is built on top of OAuth2 to support modern applications requirements. I also believe the combination of both is the best approach. Let’s talk shortly about OAuth2.
OAuth2: The short story
OAuth 2 is an authorisation framework that enables applications to obtain limited access to user accounts on an HTTP service. It works by delegating user authentication to the service that hosts the user account, and authorising third-party applications to access the user account. OAuth 2 provides authorisation flows (it’s also called ouath dance) for web and desktop applications, and mobile devices.
OAuth2: Roles
OAuth2 defines specific roles the actors in the dance must play:
-
Resource Owner: is the user who authorises an application to access their account. The application’s access to the user’s account is limited to the “scope” of the authorisation granted (e.g. read or write access)
-
Resource / Authorization Server: The resource server hosts the protected user accounts, and the authorisation server verifies the identity of the user then issues access tokens to the application
-
Client: is the application that wants to access the user’s account. Before it may do so, it must be authorised by the user, and the authorisation must be validated by the Authorisation Server
OAuth2: Abstract Protocol Flow
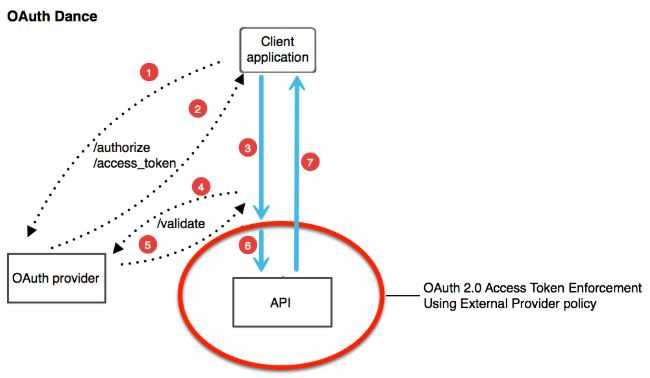
Here is a more detailed explanation of the steps in the diagram:
- The application requests authorisation to access service resources from the user
- If the user authorised the request, the application receives an authorisation grant
- The application requests an access token from the authorisation server (API) by presenting authentication of its own identity, and the authorisation grant
- If the application identity is authenticated and the authorisation grant is valid, the authorisation server issues an access token to the application. Authorisation is complete.
- The application requests the resource from the resource server and presents the access token for authentication
- If the access token is valid, the resource server serves the resource to the application
Above flow will differ depending on the authorisation grant type in use, but this is the general idea.
OAuth2: Grant Types
The first four steps on the abstract protocol flow cover obtaining an authorisation grant and access token. The authorisation grant type depends on the method used by the application to request authorisation, and the grant types supported by the authorisation server. OAuth 2 defines four grant types, each of which is useful in different cases:
- Authorisation Code: used with server-side Applications
- Implicit: used with Mobile Apps or Web Applications (applications that run on the user’s device)
- Resource Owner Password Credentials: used with trusted Applications, such as those owned by the service itself
- Client Credentials: used with Applications API access
OpenID: Grant Types Added
- Hybrid: Is a combination of the implicit and authorisation code flow — it uses combinations of multiple grant types, most typically
id_toke
- Device flow: Is designed for browserless and input constrained devices, where the device is unable to securely capture user credentials. This flow outsources user authentication and consent to an external device (e.g. a smart phone).
IdentityServer Project
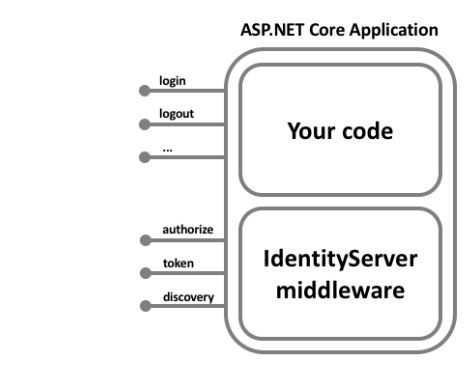
We said that authentication / authorisation is a common requirement for nowadays application, we also said that you should push as much as possible to use an external cloud identity provider. If it’s not the case, you (we) are lucky, for those situation there is great open-source and well documented framework implemented for Dominick Baier and Brock Allen called IdentityServer.
Just google for whatever concept we mentioned before and add to the search “Net Core” (the platform we want to use to build our service) and “Identity Provider” (what our service is going to provide).
Simple like that, you will see how many references point to the same site, The IdentityServer Project
The IdentityServer project contains a set of sub-projects and split in a smart way to ease the integration in currently running application:
- IdentityServer4
- QuickStart UI
- Access Token Validation Handler
- ASP.NET Core Identity
- EntityFramework Core
- Samples
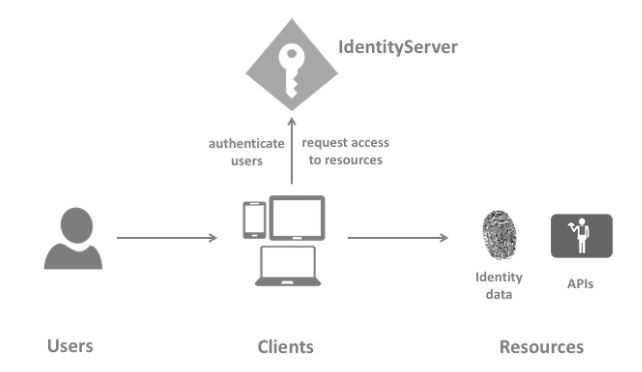
Before diving deeper into the details the are some terms that you should be aware of, below are the common ones:
- Users: Humans using a registered client to access resources
- Clients: A piece of software, registered in the IdentityServer, that request an identity token to authenticate a user or an access token to access a resource
- Resources: What you want to protect with the IdentityServer, either identity data of your users or APIs
- Identity Token: It’s the result of the authentication process and usually contains the subject claim (a user identifier)
- Access Token: Allows access to an API resource. Clients request access tokens and forward then
Now that you know the basis about OAuth2 and you found the IdentityServer4 middleware it’s the right time to start building your first Authentication As Service project. Keep closer, i will cover it in the next post Creating your global identity provider — Part II.

